

Bitdeer Cuts BTC Reserves to Zero as AI Grows

Bitdeer has sold all of its self owned Bitcoin holdings as the mining giant pivots aggressively toward artificial intelligence infrastructure.
Key Takeaways
- Bitdeer reduced its Bitcoin treasury to zero, selling 943.1 BTC in reserves plus newly mined coins.
- The company is shifting capital toward AI and high performance computing infrastructure.
- Mining margins are tightening, with network difficulty rising 14.7 percent and Q4 gross margin falling to 4.7 percent.
- Despite selling its holdings, Bitdeer now leads public miners in self managed hashrate capacity.
What Happened?
Singapore based crypto mining firm Bitdeer has fully liquidated its corporate Bitcoin holdings, marking a sharp shift from the traditional hold strategy embraced by many of its peers. The company confirmed it sold 943.1 BTC from its reserves along with approximately 189.8 BTC mined during its most recent operational update.
The sale comes as Bitcoin trades between 65000 dollars and 68000 dollars, well below its all time high, and as mining economics become increasingly challenging.
A Clean Break From the HODL Strategy
Bitdeer’s decision stands in contrast to companies like MARA Holdings and MicroStrategy, both of which continue to treat Bitcoin as a long term treasury reserve asset.
At the start of 2026, Bitdeer held roughly 2000 BTC. By the end of January, reserves had fallen to 1530 BTC. On February 13, holdings dropped again to 943.1 BTC before being fully liquidated days later.
Importantly, the company clarified that the zero balance applies only to its corporate treasury and does not include customer deposits held on its platform.
Mining Economics Under Pressure
The move comes at a time when Bitcoin mining margins are tightening across the industry.
Recent data shows:
- Bitcoin network difficulty increased by 14.7 percent in the latest adjustment.
- Bitdeer’s gross margin declined to 4.7 percent in Q4.
- The company mined around 184 BTC in late February and sold the full amount immediately.
These pressures are not unique to Bitdeer. Public miners such as TeraWulf, Bitfarms, Riot Platforms, and Core Scientific have increasingly sold portions of their mined Bitcoin or pivoted toward artificial intelligence data center operations to stabilize revenue.
Despite the treasury liquidation, Bitdeer recently surpassed MARA Holdings in self managed hashrate, reaching 63.2 exahashes per second after a 14 percent capacity increase driven by its proprietary SEALMINER technology. That makes it the largest publicly traded miner by self operated capacity.
Funding the AI Ambition
The Bitcoin selloff coincides with a broader capital restructuring effort.
Bitdeer announced an upsized 325 million dollar private offering of convertible senior notes, with an additional 50 million dollar purchase option for initial buyers. The company also plans to allocate 138.2 million dollars to repurchase its existing 5.25 percent convertible notes due in 2029, effectively extending its debt runway.
Shares of Bitdeer, trading under BTDR, declined nearly 3 percent in overnight trading following the announcement and had previously dropped more than 18 percent after dilution concerns tied to the convertible note offering.
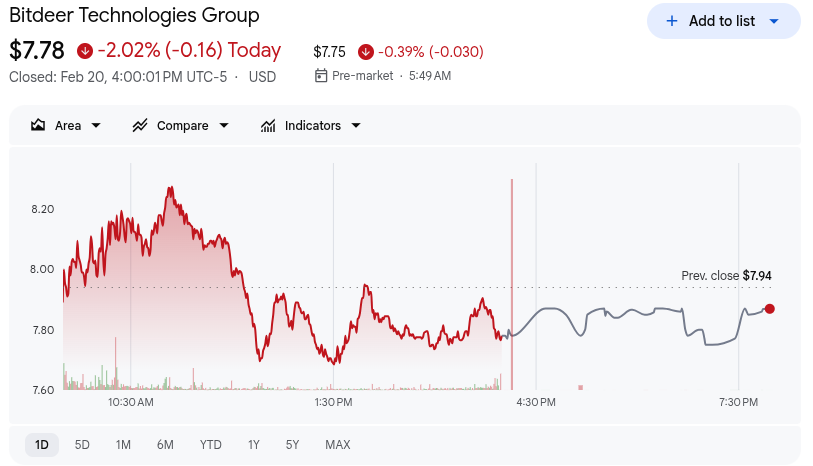 Image Credit – Google Finance
Management has framed the treasury liquidation as part of a strategic pivot toward high performance computing and AI cloud infrastructure. With access to a 3.0 gigawatt power portfolio, the company aims to build large scale data centers capable of hosting GPU services and artificial intelligence workloads.
The company has not clarified whether the zero Bitcoin position represents a permanent shift or a temporary capital allocation decision.
CoinLaw’s Takeaway
In my experience, this is one of the boldest strategic shifts we have seen from a major public miner. Bitdeer is essentially saying that owning Bitcoin is less attractive than building the infrastructure that powers the next wave of AI growth.
I believe this signals a broader industry evolution. Mining is becoming a thin margin business, and only operators who diversify into AI and data centers may sustain long term profitability. Bitdeer is betting that predictable infrastructure revenue will outperform volatile crypto price exposure. Whether that bet pays off will depend on execution, but it clearly marks a new chapter for the company.
The post Bitdeer Cuts BTC Reserves to Zero as AI Grows appeared first on CoinLaw.
You May Also Like

The Stunning ASEAN Winner Emerges As Manufacturing Shifts Accelerate

MySQL Single Leader Replication with Node.js and Docker
command: --server-id=1 --log-bin=ON The --server-id option gives each MySQL server in your replication setup its own name tag. Each one has to be unique and without it, replication won’t work at all. Another cool option not included here is binlog_format=ROW. This tells MySQL how to keep track of changes before passing them along to the replicas. By default, MySQL already uses row-based replication, but you can explicitly set it to ROW to be sure or switch it to STATEMENT if you’d rather log the actual SQL statements instead of row-by-row changes. \ Run our containers on docker Now, in the terminal, we can run the following command to spin up our database containers: docker-compose up -d \ Setting Up Our Master (Primary) Server To configure our master server, we would have to first access the running instance on docker using the following command docker exec -it mysql-master bash This command opens an interactive Bash shell inside the running Docker container named mysql-master, allowing us to run commands directly inside that container. \ Now that we’re inside the container, we can access the MySQL server and start running commands. type: mysql -uroot -p This will log you into MySQL as the root user. You’ll be prompted to enter the password you set in your docker-compose.yml file. \ Next, we need to create a special user that our replicas will use to connect to the master server and pull data. Inside the MySQL prompt, run the following commands: \ CREATE USER 'repl_user'@'%' IDENTIFIED BY 'replication_pass'; GRANT REPLICATION SLAVE ON . TO 'repl_user'@'%'; FLUSH PRIVILEGES; Here’s what’s happening: CREATE USER makes a new MySQL user called repl_user with the password replication_pass. GRANT REPLICATION SLAVE gives this user permission to act as a replication client. FLUSH PRIVILEGES tells MySQL to reload the user permissions so they take effect immediately. \ Time to Configure the Replica (Secondary) Servers a. First, let’s access the replica containers the same way we did with the master. Run this command in your terminal for each of the replica containers: \ docker exec -it <replica_container_name> bash mysql -uroot -p <replica_container_name> should be replace with the name of the replica container you are trying to setup b. Now it’s time to tell our replica where to get its data from. While inside the replica’s MySQL shell, run the following command to configure replication using the master’s details: CHANGE REPLICATION SOURCE TO SOURCE_HOST='mysql-master', SOURCE_USER='repl_user', SOURCE_PASSWORD='replication_pass', GET_SOURCE_PUBLIC_KEY=1; With the replication settings in place, let’s fire up the replica and get it syncing with the master. Still inside the MySQL shell on the replica, run: START REPLICA; This starts the replication process. To make sure everything is working, check the replica’s status with:
SHOW REPLICA STATUS\G; Look for Replica_IO_Running and Replica_SQL_Running — if both say Yes, congratulations! 🎉 Your replica is now successfully connected to the master and replicating data in real time.
Testing Our Replication Setup from the Node.js App Now that our replication is successfully set up, we can configure our Node.js server to observe the real-time effect of data being replicated from the master server to the replica server whenever we write to it. We start by installing the following dependencies:
npm i express mysql2 sequelize \ Now create a folder called src in the root directory and add the following files inside that folder connection.js, index.js and model.js. Our current directory should look like this We can now set up our connections to our master and replica server in the connection.js file as shown below
const Sequelize = require("sequelize"); const sequelize = new Sequelize({ dialect: "mysql", replication: { write: { host: "127.0.0.1", username: "root", password: "master", database: "replicaDb", }, read: [ { host: "127.0.0.1", username: "root", password: "slave", database: "replicaDb", port: 3307 }, { host: "127.0.0.1", username: "root", password: "slave", database: "replicaDb", port: 3308 }, { host: "127.0.0.1", username: "root", password: "slave", database: "replicaDb", port: 3309 }, ], }, }); async function connectdb() { try { await sequelize.authenticate(); } catch (error) { console.error("❌ unable to connect to the follower database", error); } } connectdb(); module.exports = { sequelize, }; \ We can now create a User table in the model.js file
const {DataTypes} = require("sequelize"); const { sequelize } = require("./connection"); const User = sequelize.define("User", { name: { type: DataTypes.STRING, allowNull: false, }, email: { type: DataTypes.STRING, unique: true, allowNull: false, }, }); module.exports = User \ and finally in our index.js file we can start our server and listen for connections on port 3000. from the code sample below, all inserts or updates will be routed by sequelize to the master server. while all read queries will be routed to the read replicas.
const express = require("express"); const { sequelize } = require("./connection"); const User = require("./model"); const app = express(); app.use(express.json()); async function main() { await sequelize.sync({ alter: true }); app.get("/", (req, res) => { res.status(200).json({ message: "first step to setting server up", }); }); app.post("/user", async (req, res) => { const { email, name } = req.body; let newUser = await User.build({ name, email, }); // This INSERT will go to the write (master) connection newUser = newUser.save({ returning: false }); res.status(201).json({ message: "User successfully created", }); }); app.get("/user", async (req, res) => { // This SELECT query will go to one of the read replicas const users = await User.findAll(); res.status(200).json(users); }); app.listen(3000, () => { console.log("server has connected"); }); } main(); When you make a POST request to the /users endpoint, take a moment to check both the master and replica servers to observe how data is replicated in real time. Right now, we are relying on Sequelize to automatically route requests, which works for development but isn’t robust enough for a production environment. In particular, if the master node goes down, Sequelize cannot automatically redirect requests to a newly elected leader. In the next part of this series, we’ll explore strategies to handle these challenges
